Like what DAW, EQ, compressor, reverb etc do you use for the vocals? I’m trying to get better at mixing but I can never get the right sound, specially when using Solaria. Do you have any advice?
I’m far from an expert, but I think it’s important to start by saying it doesn’t matter which exact tools you use, as long as you know the ideas behind how they work and what they do to a sound.
For example, just because FabFilter Pro-Q 3 is one of the most popular EQ plugins does not mean you should go out and spend $169+ on it.
Most DAWs will come with a sufficient set of stock plugins that can do everything you need, and those fancy paid plugins usually require that you have a good grasp of the basic usage before you can even start to make the pricetag worth it. If your DAW seems lacking in some areas, many people suggest the free Kilohearts Essentials package, which should fill any gaps.
As for what I personally use, as a DAW I went with FL Studio. My reasons for this are:
- Future updates at no additional cost
- A solid set of stock plugins with few gaps
- Many online tutorials
For mixing, I generally start with pitch correction. This might seem silly when using a synth, but personally I like the results of having some gentle automatic pitch correction on the vocals. MAutoPitch is a solid free option.
Then a targeted EQ to get rid of any problematic frequencies. Very narrow notches targeting any frequencies that are too harsh or which resonate in a bad way. The exact frequencies will be different each time.
Next is compression. I start with a very basic compressor (Fruity Compressor), usually at 3-4 ratio and a fast attack. The other settings are all different based on the vocalist and song. Here’s a good video explaining compression: Production Basics 4: Compression - YouTube
Then a broad EQ, adjusting the lows/mids/highs depending on the sound I want for the song.
Maybe some gentle distortion depending on the song.
A de-esser!!! This step is important for addressing harsh sibilant sounds (though it doesn’t necessarily have to go here in the chain, just don’t forget to use one). Spitfish and T-De-Esser are solid free options.
Then more compression, just to squish the peaks a bit more.
Even if I have other layers from SynthV, at this point I usually send the vocal to a couple other inserts to create more artifical doubles or add more effects based on the song (exciter, saturation, etc).
Send all the layers to a “Lead Bus” where I combine them all, put it through a final multiband compressor and/or EQ and apply the delay/reverb.
That’s generally the process for the lead vocal. The harmonies, adlibs, and other layers typically undergo a similar but also simpler chain since you don’t usually want them to take the focus away from the lead.
Again, I’m by no means a production expert, but these are the general steps that I take based on the tutorials I’ve watched and my trial-and-error experiences making covers.
I would be very interested to see more professional perspectives as well.
「いいね!」 12
By crying internally.
No but really, Claire covers a lot of it already.
I’m no expert either, but the steps they mentioned are basically standard.
My only suggestion remaining is really just taking great care of volume balancing since how loud/quiet a portion of the singing or the instrumentals are will make a world of difference.
Voice filters like reverb is basically essential these days and FFT Filters are my go to’s if I wanna soften or sharpen vocals.
There’s also no singular rule to any of this. How you want your music to sound like will change the process entirely.
「いいね!」 3
Claire covered just about everything.
To me, the key is remembering that vocals are the heart of the song. The arrangement exists to support the vocals, not the other way around. So if there vocals are clashing with the arrangement, consider first if perhaps the backing is what needs to be changed.
If there’s an issue with the vocals, fixing them in the SynthV editor is the first and best plan. Adjust the Loudness/Tension/Breathiness/Gender/Tone Shift to get a good performance. You’re rarely going to be able to “fix it in the mix” if there’s a fundamental issue with the vocals.
The DAW itself is sonically neutral. One DAW doesn’t sound better than another. So the DAW you select depends on what workflow works for you, what features you find most important, and whether you need to share the stems with other users.
There are lots of different ways to accomplish similar results. For example, you’ll generally want the vocal to be at a constant level.
The standard way to accomplish this is to use one or more compressors. You want compressor that is “neutral” and doesn’t color the sound of the vocal. Just about any compressor will do the trick. You can put compressors in series, so that one compressor doesn’t have to do all the work.
On the other hand, you might use something like Waves’ Vocal Rider, which will automatically ride the gain control to keep the volume level. It’s essentially the same as a compressor, but not quite. There are a number of plugins that do exactly the same thing.
You can also draw in gain envelopes around vocals and level them yourself manually. It’s a bit more tedious, but will give better control.
Personally, I like to slice the vocals into segments, and then normalize all the segments. This is even more tedious, but it gives me the most control
So - lots of ways of doing something, and they all accomplish the same sort of thing. Knowing what you’re trying to accomplish is typically more important than what tool you use.
Working with the EQ is a matter of listening and knowing what you want to change. As a rule, it’s pretty safe to cut off the low ends frequency from the vocals (and other instruments), because a lot of low-end frequencies muddy up a mix. Anything past that - if you can’t hear what you’re doing, leave it alone.
Again, although there are “character” EQs that color the sound, that’s generally not what you’re looking for.
Reverb is very subjective. You can use reverb to place a voice into a space by adding ambient reverb from a vocal booth or room. You can add thicken and make a voice lush by using a plate reverb. What’s appropriate depends on the music style you’re going for.
There’s a whole lot of debate on what reverb is better than another, but the truth is that it generally doesn’t matter. The listener shouldn’t notice the reverb. So dial it in until you notice it… and then dial it back a notch.
There are plenty of free impulse responses (IRs) of great spaces and classic reverbs. The odds are good that your DAW supports IRs out of the box. So you probably don’t even need to use a dedicated reverb - just load an IR.
And don’t forget about delays - they’re a way to add depth without potentially adding low-end mud that a reverb can.
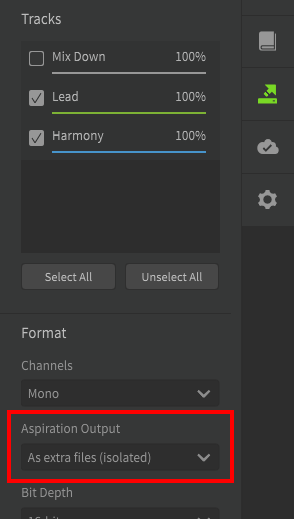
Something else to consider is splitting off the vocal between the voiced and unvoiced portion. The SynthV Pro editor allows this, and it’s a great feature.
The voiced portion of a vocal contains the pitched portion - the part that’s “sung”. The unvoiced portion contains the consonants, and is needed for clarity.
With the vocal split, you can do things like putting a lush reverb on the voiced part, and leaving the unvoiced/aspirated portion fairly dry. That gives you a rich sound without losing the intelligibility of the vocal.
There’s also a “de-esser” to consider for taking the harshness of some of the sibilants. Again, and one will do, and there are a number of free ones.
Personally, I go through the vocals, and when I find a sibilant that needs to be adjusted, I draw a gain envelope around it and adjust it manually until it sound right. I prefer that level of control.
Finally, it’s a good idea to listen to a reference track - something that sounds roughly like what you’re aiming for. This will help make sure that the vocal - and the other instruments - are at about the right level in the mix.
「いいね!」 8
I agree that Claire got the basics of where you’d want to start before you progress. While I Use Reaper, which has excellent included FX and a couple of really good YouTube channels for instructions. One thing I like to do is to output in 24-bit as 16-bit has serious sibilant and plosive problems. 24-bit isn’t perfect so I manually de-ess the really offensive K and T sounds in Sound Forge (an audio editor - keep a copy of the original soundfile first though) with a smoother plug-in. I’ve also set up a set of different compressors to process in parallel so the tone is altered and then compress all of the compressed signals when they’re mixed back along with a de-esser to catch the little issues. There isn’t a right way to do anything - it’s as much fun trying to get something better as it is to create the singing in the first place.
Mixing/Production is an ever-expanding space you’ll grow into and practice makes better (perfect is an unatainable goal)
「いいね!」 3
Please, where I can find the Vocal Split function splitting off the vocal between the voiced and unvoiced portion?
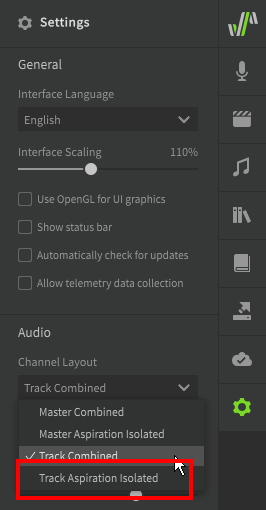
Aspiration output is a Pro feature, so you can’t do it in the Basic edition.
When rendering to .wav file (Saving the Audio - Synthesizer V Studio Unofficial User Manual)
When used as a VST (VSTi/AU Plugin - Synthesizer V Studio Unofficial User Manual)
「いいね!」 7
Thank you everyone for your answers, they were very helpful.
I have the Pro version but I hadn’t noticed the functions of that panel. Thanks a lot Claire, you lit me up!
There is no general answer or solution for this. The only way you learn how to get better is by actually mixing more tracks. Your ear needs to be trained first. What use is a compressor if you don’t actually hear what it does?
Overall the tools are not really that important, what is important is if you can use them.
An intuitive UI design like the fabfilter plugins helps a lot with getting an understanding of what’s actually happening. A more expensive plugin won’t magically fix your mix though.
There’s tons of good YouTube tutorials on how to mix vocals, watch them and you’ll certainly pick something up here and there. Just don’t try to imitate by copying values, that will never ever work.
With enough patience you’ll get your desired outcome, I promise!
「いいね!」 3
Bonjour
I’m not very trained with Solaria, I will release my 1st song in a few weeks, and I consider my self as a songwriter, not a mix expert. For vocals mixing, I use Izotope product, Nectar/Neutron , sounds fine to my ears.
「いいね!」 1
Use Reaper for a DAW if you don’t have one. $60 one time payment, but the trial is free.
Purchase a subscription to Plugin-Alliance and use ALL of their plugins for $20 a month.
There might be a trial available?!
They have “mixed with Plugin Alliance” videos to emulate. Many of the tutorials have to do with mixing vocals.
Any audio can be routed into Reaper for post processing.
It’s a long journey and Rome wasn’t built overnight, however, you will have immediate results.
「いいね!」 1
DAW: Reaper;
EQ: Exonic UK AI Master, TBTech Kirchoff-EQ, Elysia Alpha Master, Phils Cascade, TOMO Lisa, Knif Audio Soma;
Compressor: NoiseAsh Rule Tec(PulTec) Suite, AMEK Mastering Compressor, Shadow Hills Mastering Compressor, Purple Audio MC 77, SPL De-Verb Plus, Universal Audio Teletronix LA-2A, 1176LN Classic Limiting Amplifier;
Reverb: Unfiltered Audio Tails, Muramasa MorphVerb, Exponential Audio Excalibur, PhoenixVerb, dearVR Pro, Fiedler-audio SpaceLab Interstellar.
Other: Noveltech Vocal Enhancer, Black Box Analog Design HG-2, Looptrotter SA2RATE 2, Antares Auto-Tune Realtime Advanced, Brainworx bx_crispytuner, Maor Appelbaum Mastering HendyAmps The Oven. (used less often)
Many more plus hardware (TC-Helicon VoiceLive Rack), but these listed above are my main goto’s for vocals.
Sorry. I came back because I felt like I didn’t answer the question completely.
「いいね!」 1
CLA Vocals works fine for me, it even has presets ![]()
「いいね!」 2
I use a multiband compressor from 6khz to 13khz to get rid of all harsh sounds. Just compress or basically limit it very hard, something like -20db and thats it. This may differ between voices/mics so you have to experiment with the range a little or use/combine with a normal de-esser. Software specifically doesn’t matter at all. EQ curves and stuff really just depends on the specific song.
Generally just A/B compare your song with one that has the sound you want. For current radio pop stuff I tend to go for Ava Max songs. Audio Engineering is quite a learning process, don’t forget to have fun ![]()
「いいね!」 3
A little saturation and reverb helps along with what everyone else said .
「いいね!」 3
My vocal fx chain is usually melda mautopitch, ssl vocalstrip 2, tr5 de-esser, tr5 1176 compressor, tr5 la-2a compressor, short delay (usually tr5 space delay on slapback), delay (baby audio comeback kid), long reverb (soundtoys superplate), slate digital fresh air and softube harmonics
「いいね!」 2
Here like an example…

「いいね!」 4
I personally mainly use an LA-2A style compressor (I use IK Multimedia’s White 2A, but I used to use Waves’ CLA-2A) and Joe Chiccarelli Vocal Strip (Handles deessing, compression, tone shaping, basic reverb + delay, and slight drive if needed).
Anything else I add depending on the track. Usually I add a fully wet reverb (a PS1 convolution reverb, or just ValhallaDSP’s ValhallaSupermassive) in parallel that’s sidechained (I use TDR Molotok) by the main vocal chain.
Then I just balance the mix by ear and comparing it to other music I like.
For context I make shoegaze inspired stuff and I use IK Multimedia plugins because I got T-Racks 5 Max for cheap lmao
「いいね!」 2
IK’s plugins are great. I have almost all MAX bundles, but I really hate their business models.
I also use Joe Chiccarelli’s voice strip for fast treatment while composing/arranging then I usually switch to Izotope’s Nectar for the final mixing.
However TRacks is really good, I sometimes use it instead of Ozone for Mastering.
「いいね!」 1