Well, I continue to plod and like it so much I purchased 2 more voice banks. I love the sound of Asterian from Eclipsed Sounds but it seems to be impossible to tame the vibrato. On some parts the depth is 1.5 semitones and fast. I’ve gone into the “voice” panel and tried everything under vibrato. First, it at least does something in standalone but nothing as a vst. I’ve also tried the “notes” panel with little success. I may be able to tame it with melodyne but accurate pitch and vibrato that isn’t freaky seems pretty basic. Any suggestions?
Also, in the parameter window beneath the piano roll, what is the “Edit” vs “Display” button and does it display only below or on the piano roll? Also, the 4 buttons between the pencil and 2x 4x… what’s the difference?
A few main options:
- Reduce the Vibrato Modulation slider in Note Properties
- Reduce the Expressiveness slider in AI Retakes
In this screenshot the notes on the left have the default settings, the ones on the right have those settings reduced to minimum:
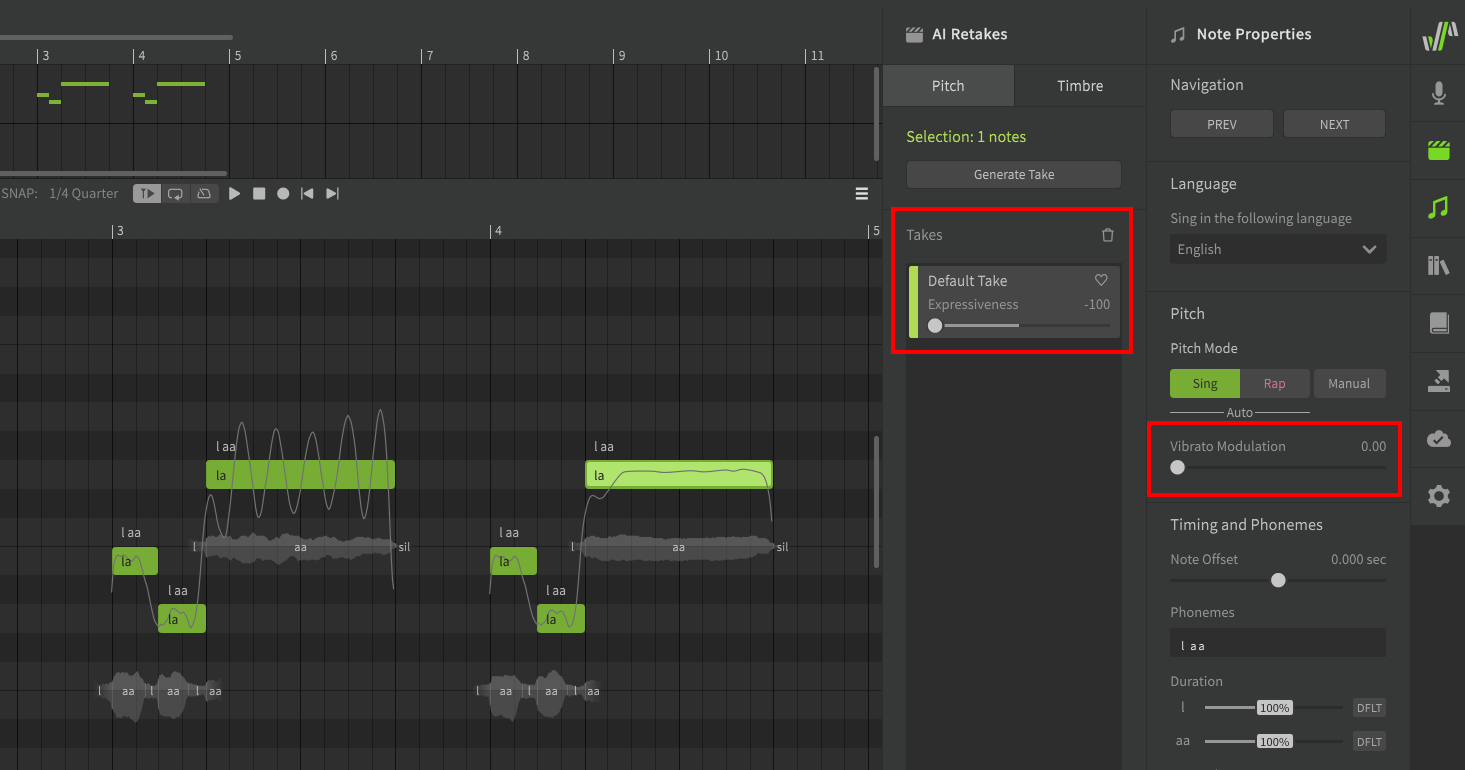
If that’s still not good enough, turn on Manual mode in Note Properties and adjust the curve manually, either via the Parameters panel or directly in the Piano Roll
Keep in mind that the “Vibrato” sliders that show up in Note Properties after switching to Manual mode are not related to the automatically-generated vibrato; it’s a completely different method of adding vibrato.
Edit is the foreground parameter, which can be edited. Display refers to the background parameter, so you can keep a second curve visible for reference.
Parameters panels can only be snapped to the top or bottom of the Piano Roll. Click and drag the “Parameters” label to move it if you want.
You can find descriptions of all the controls in the Parameters panel here:
I tried all those things with little change. Do all voice banks support editing modulation (unsure of the difference between AI voice banks and others.) Another question about penciling in the wave on the piano roll or the parameters- is there a way to draw a straight line (like holding the ctrl key while drawing) or a wave within certain limits).
The screenshot I posted is with Asterian, so it’s the same as you’re using. As long as you’ve updated to the latest version you can use the Vibrato Modulation slider.
There is a straight-line tool in the Parameters panel, however the Pitch Deviation parameter represents the difference between the base curve and the final result, so a straight line in the parameter won’t necessarily result in the same thing in the resultant curve. It’s helpful for other parameters, but not so much for Pitch Deviation.
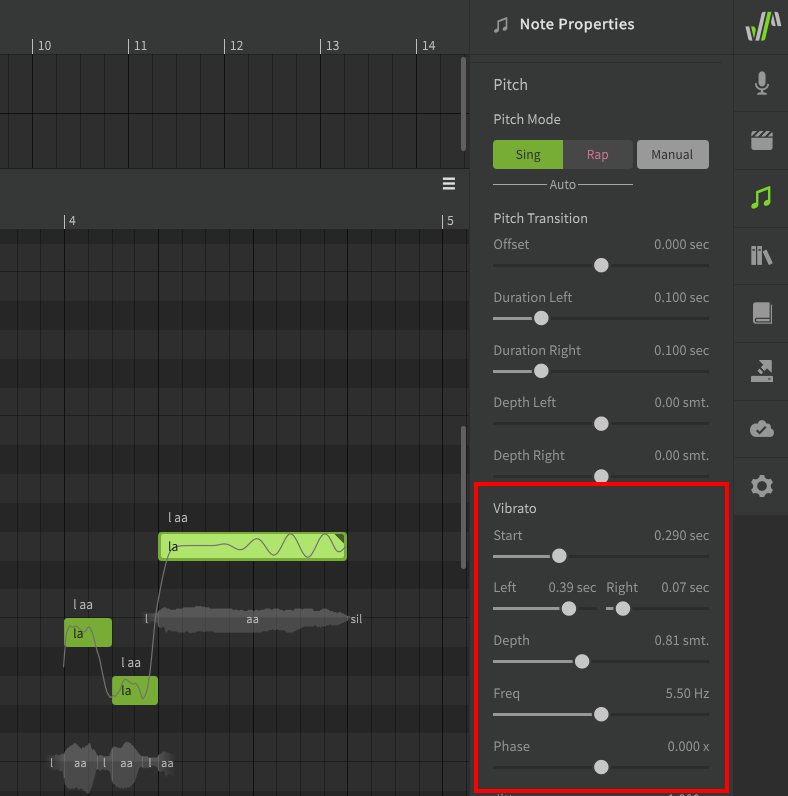
If you want to make a simple wave within set limits, without drawing it by hand, you’ll likely want to do the following:
- Set the note to Manual mode
- Clear the Pitch Deviation parameter (these are the AI-generated curves from when it was not in Manual mode)
- you can do this quickly by selecting the pencil tool and dragging across the section while holding right click
- Use the Manual mode Vibrato sliders to create a simple sine pattern
More info about those sliders here:
Yes that would be an added verification but so far not had the need
Wow that is some grief, imagine doing that for 100 note song. There ought to be a global setting when starting a song track, so Asterian doesnt pitch wobble about so much. AI out of control. Watch out world. Keep us in the loop with progress @James_J
So, I found a video from an earlier version with Instant Mode, where you could turn it off and use the manual mode and it looked like it worked pretty well. With Instant Mode gone, I assumed you turned of Sing Pitch mode and would have full manual control, but it seems like when you select Manual Mode that Sing mode is still enabled. Why is the Sing Mode button still lit up when I select the manual mode button? If they aren’t connected then why is vibrato modulation not in manual mode?
Synthesizer V - Advanced Tips #1 - YouTube
In this video, disabling instant mode does what I want, but when I select manual mode, mine does NOT do this. I can put depth to zero and there is no change.
OK… think I found it (why are these things buried)… I go into settings and change the default pitch mode to manual and turn off “from sing to manual mode” that preserves what sing mode created. I think without that, the changes in manual mode simply are not applied.
In the beta it was a three-way switch between Sing/Rap/Manual, but people apparently found that even more confusing and so it was changed to this new method, in which you choose Sing or Rap, then toggle Manual on or off.
And yes, that means that once Manual mode is enabled it doesn’t matter whether Sing or Rap is lit up, it just keeps the same color so you can visually delineate between phrases. (I think this is the main reason for the change, because people wanted to use Manual mode to “lock in” the pitch, but then it would change color, and users still wanted their Rap notes to be red even if it wasn’t actively generating Rap pitch curves)
I personally found the beta-1 implementation more intuitive, but I suppose Dreamtonics must have gotten sufficient feedback indicating otherwise.
But your initial assumption was correct. Instant Mode and Sing Mode are the same thing, except the newer iteration of the feature is note-specific instead of for the entire project.
It does mean that those of us who prefer Manual mode have a couple extra settings to change though, compared to the old version where we just unchecked the “Enable Instant Mode by Default” box.
Once I unchecked “from sing to manual mode” in settings it essentially works though I’d like a way to have the vibrato depth increase over the span of the note (I thought the left - right did that but it seems to have no impact of the depth.) The problem with the pitch/vibrato seems to be more obvious with lower pitched notes. For any of Asterian’s notes around B2 that last for a measure, the vibrato pitch depth is really large and fast and extremely pitchy. Using the manual mode I can now fix most of that (except the center pitch which I’ll have to correct with Melodyne.) What I’m wondering is if there’s macro or script where I can apply a manual pitch change to selected notes. For these notes I have to start the vibrato to .5 ms, reduce the depth to .8semitones and reduce the frequency. To go into 70 different notes to do this will take forever. A macro or script would be very helpful. Thanks again for all your help. I’m not sure this app is “ready for primetime” but it’s far faster than trying to sing it myself.
Asterian’s recommended range is E2-D4, or G4-C5 for falsetto. This is likely a result of the software not having any information for notes around B2 and attempting to “fill in the gaps”.
If you want the same settings for everything then you can select all the relevant notes and adjust the sliders in Note Properties once, or modify the default values for the entire track in the Voice panel.
By holding ctrl while clicking on a note you will add it to the current selection instead of changing the selection. You can also use shift in the same manner to select a consecutive sequence of notes.
If the pitch deviation is slightly off-center you can select the points with the pointer tool and drag them up/down. You can hold shift+ctrl while dragging for more precision.
As for scripts, there are quite a few, but most people make scripts that do specifically what they need, rather than a more generic tool. I’m not sure if this’ll do exactly what you’re hoping for, but this Progressive Vibrato script was made to be somewhat more flexible than the slider-based sine patterns. (note that it does so by adding Pitch Deviation curves, not by moving the sliders)
I expect someone has already posted something like this, but I can’t see it when I’ve been scrolling down.
Synth V does not read the tempo from the midi files. The reason you have the midi file appearing longer than the sound files is that 133bpm when played at 120 takes a lot longer. I’ve had this problem before (I think midi files work on the actual time between events and sequencers normally read what the tempo is from the file.)
Import the midi file, set the tempo, then import the instrument tracks.
Indeed something unexplained going on midi/SV/audio. When they get out of sync it can sink a lot of time ![]()
I saw something about putting a short B2 note at the beginning of the track for sync use.etc
I’ve had it happen a couple of times, both when I used a tempo other than 120. The one with tempo changes in it was a real pain. However I have not had any problems when the tempo is 120 or 60 (that has it’s own issues)
I’ve made significant progress in learning how to use Synth-V and like it very much. That said, I still run into road blocks. The current one- I’ve added background SV vocals to an existing Cubase project. Whether working in Standalone or in the DAW I find it nearly impossible to precisely place the start and end of notes. In Cubase, when the project is playing, SV playhead cursor follows the DAW, but if I place the cursor in Cubase at the start of an audio note, in order to have a tight start with the SV voice, the cursor doesn’t follow, so I have to guess and the result is sloppy. Likewise, in standalone mode, I try to match the SV voice to the imported audio, but there’s no way to expand the height of the wave form in the imported track to see when the note starts. I’d prefer to match the note timing in my DAW. Is there something I’m missing where I can put the cursor at some point in Cubase and the cursor in SV will be at the exact same spot?
The simplest method is to refer to measure indicators, but if you’re working with fine levels of precision it comes down to a limitation of the VST3 format.
VSTs can only access the playhead information during playback, so simply moving the playhead in the host doesn’t send any information to the plugin until you press play.
If you want to get the playhead to the exact same location in both timelines:
- Select the correct playhead location in the host
- Ensure SynthV is set to “stop” behavior instead of “pause” so the playhead returns to the original position

- In the host DAW, briefly begin and then stop playback to sync the playhead. SynthV will receive the playback information from the DAW, and after being stopped, the playhead will return to the position that playback started from.
There are some exceptions to this rule for plugins and hosts that also include Celemony’s ARA2 plugin extension, but SynthV Studio does not have ARA2 support (at least not yet), nor do many DAWs such as Ableton Live, Bitwig, and FL Studio (though Cubase has supported it since mid-2019, both the plugin and the host need to have the extension implemented). Audio Random Access - Wikipedia
Sources regarding the relevant VST methods and callbacks, specifically from JUCE’s implementation which SynthV is built on: JUCE: AudioProcessor Class Reference and JUCE: AudioProcessor Class Reference
Well, I don’t know if it’s a problem with my Cubase project but even using the method above, when I stop the playhead in the DAW and it returns to start SV is 5/16 off. This would make sense if the tempo was off, but both are set to 133bpm at 3/4 time. The start at 0 matches on both but if I stop it at measure 2 in the DAW, the playhead in SV is 5/16 before the note. No other VST instruments are having trouble following… only SV. At this point, I can get close by exporting the audio from Cubase into the Standalone, but it’s really difficult to discern note changes with the small wave forms in SV.